Sunday, April 27, 2025

How to Call Key Vault Secrets in an Azure Function


    1. To access Key Vault secrets from an Azure Function, you need to install the following NuGet packages in your project:

  • Azure.Identity
  • Azure.Security.KeyVault.Secrets

    2. Below is the method I wrote to access Key Vault secrets.

internal string GetSecret(string secretName)
{
    string keyVaultName = Environment.GetEnvironmentVariable("keyVaultName");

    string kvUri = $"https://{keyVaultName}.vault.azure.net";

    SecretClient client = new SecretClient(new Uri(kvUri), new DefaultAzureCredential());
    var secret = client.GetSecretAsync(secretName).Result;

    return secret.Value.Value;
}

    3. The Key Vault name is retrieved from an environment variable.

string keyVaultName = Environment.GetEnvironmentVariable("keyVaultName");

    4. I trigger the GetSecret method from the Azure Function and assign the secret value to the response.

    5. After publishing the Azure Function, you need to add the Key Vault name as an environment variable in the function app settings.


Follow these steps to configure the identity and assign the roles:

    1. Open the Identity section in the Azure Function app settings, enable the status, and click on Azure role assignments.


    2. Click on Add role assignment, and set the scope to Key Vault.

    3. Assign the appropriate resource (Key Vault) and role(Key Vault Secrets User).


    4. The role is now assigned, and the Azure Function can access the Key Vault.


    OutPut: 

 
Keep Daxing!!

Tuesday, April 15, 2025

Convert JSON to CSV/Text file in Logic app

Convert JSON to CSV/Text file in Logic app

This is the full step-by-step process, and I have provided its output below.


I used the below JSON to test this.

[
  {
    "Id": "1234",
    "Name": "Test1",
    "Phone": "700000"
  },
   {
    "Id": "4567",
    "Name": "Test2",
    "Phone": "800000"
  },
   {
    "Id": "6789",
    "Name": "Test3",
    "Phone": "900000"
  }
]

Please follow the below steps.


        Step 1: I have used 'When a HTTP request is received'  action.


Way 1: Manual step(Will add fields manually and assign the values) I have pipe CSV.

        Step 2: Under data operations, I chose 'Create CSV table.'  
                      

  •  We need to assign a value to the 'Value' node using the following expression, based on the header fields .
  •  I am generating the file with a pipe('|') that's why I have selected the custom.                   

  Value : item()?['Name']


        Step 3:  used the 'Compose' action and applied the 'Replace with pipe' function.

        replace(body('Create_CSV_table'), '|,|', '|')


        Step 4: The resulting file is stored in a blob        


    OutPut:   


Way 2: Automatic

    If we want same Column names then use Automatic system will generate the file with commas (',') separated.


Keep Daxing!!


Wednesday, April 9, 2025

Move the database from Dev to UAT or Tier1 to Tier2

Move the database from Dev to UAT or Tier1 to Tier2.

  • Mostly, databases are moved from Tier 2 to Tier 1 environments.
  • But in our case, most of the functional setup and configurations were completed in the Dev (Tier 1) environment, and the team needs this data to be moved to Sandbox (Tier 2). 
  • Since transactional data is involved, we cannot use Data Entities.
Therefore, we followed the process below:

Step-by-Step Process to Move the Database from Dev (Tier 1) to UAT/Sandbox (Tier 2)

1. Export the AXDB from Dev (Tier 1) (.bak)
        Export the AXDB database into a .bak file using one of the following methods:

        Way1: Right-click on the AXDB database and Select Tasks > Back Up.

        Way2: Use the following SQL script to back up the database:

      BACKUP DATABASE [AXDB] TO DISK = N'D:\Backup\AxDB_Dev.bak' WITH NOFORMAT, INIT, 
        NAME = 'AxDB_Dev Backup', SKIP, NOREWIND, NOUNLOAD, STATS = 10


2. Restore the Backup to a New Database

    Use the Restore Database option in SSMS to restore the .bak file to a new database (AXDB_Dev).


3. Run Required SQL Scripts

    Execute below SQL scripts in the newly restored database.

update sysglobalconfiguration
set value = 'SQLAZURE'
where name = 'BACKENDDB'
 
update sysglobalconfiguration
set value = 1
where name = 'TEMPTABLEINAXDB'
 
drop procedure XU_DisableEnableNonClusteredIndexes
drop schema [NT AUTHORITY\NETWORK SERVICE]
drop user [NT AUTHORITY\NETWORK SERVICE]
drop user axdbadmin
drop user axdeployuser
drop user axmrruntimeuser
drop user axretaildatasyncuser
drop user axretailruntimeuser

4. Export the Database to a .bacpac File

    This is required to move the database to Tier 2 via LCS.

    Way1:

  • Right-click the restored database, Go to Tasks > Export Data-tier Application.

  •  Select a local folder and export the database as a .bacpac file

  • click on Next and Finish

        Export duration depends on database size


    Way2 (Command Line): Use SqlPackage.exe to export the database to .bacpac.

  • Ensure SqlPackage.exe is installed on your machine.
  • Path will change for SqlPackage.exe, before executing the command please check the correct path

        Run the following command (in CMD):

Cd C:\Program Files\Microsoft SQL Server\160\DAC\bin\SqlPackage.exe /a:export /ssn:localhost 
    /sdn:<database name to export> /tf:<File path> /p:CommandTimeout=1200 
    /p:VerifyFullTextDocumentTypesSupported=false /SourceTrustServerCertificate:True

    I have used below command.

Cd C:\Program Files\Microsoft SQL Server\160\DAC\bin


"C:\Program Files\Microsoft SQL Server\160\DAC\bin\SqlPackage.exe" /a:export /ssn:localhost 
    /sdn:<database name to export> /tf:"D:\Test\AxDB_dev.bacpac" /p:CommandTimeout=1200 
    /p:VerifyFullTextDocumentTypesSupported=false /SourceTrustServerCertificate:True


5. Upload the .bacpac File to LCS

  • Go to LCS > Asset Library > Database Backup
  • Upload the .bacpac file
  • Set the Backup Type as: Product Database (SQL Server or .bak)


6. Import Database into Tier 2 Environment

    Go to the Tier 2 environment in LCS

  • Click Maintain > Move database

  • Select Import database
  • Choose the uploaded .bacpac file from the asset library

  • Complete the import wizard and confirm

The import process may take some time depending on database size.


7. Enable All Users

After the import is complete, connect to the new database using SSMS and run the following query.

update userinfo set enable = 1


Keep Daxing!!

Wednesday, April 2, 2025

How to add Admin role to user from SQL in D365FO

 How to add Admin role to user from SQL in D365FO

In SecurityRole table we will find all roles.

Execute the below statement to know the system admin role Recid.

Select Recid,* from SecurityRole where NAME like 'sys%'


Insert the data into SECURITYUSERROLE  table with username and role recid. Execute the below statement.

insert into SECURITYUSERROLE (USER_, SECURITYROLE,ASSIGNMENTSTATUS,ASSIGNMENTMODE)
values('Kishore', 235,1,1)

If you want to update you can use the below statement.

update SECURITYUSERROLE
set SECURITYROLE = 235 where  USER_ = 'Kishore'

Reference : Click here


Keep Daxing!!


Sunday, March 23, 2025

Export a Package from D365 Using the Rest API (ExportToPackage) and Upload It to Blob Storage Using Logic Apps

Export a Package from D365 Using the Rest API (ExportToPackage) and Upload It to Blob Storage Using Logic Apps


Follow the below steps:

1. Create an export project in DMF.

2. Use the ExportToPackage API URL listed below and pass the required parameters.
    URL:

{Resource}/data/DataManagementDefinitionGroups/Microsoft.Dynamics.DataEntities.ExportToPackage

   Input parameters:

  {
    "definitionGroupId":"<Data project name>",
    "packageName":"<Name to use for downloaded file.>",
    "executionId":"<Execution Id if it is a rerun>",
    "reExecute":<bool>,
    "legalEntityId":"<Legal entity Id>"
}

3. After triggering the ExportToPackage API, a record will be created in the job history, and the system will prepare a ZIP file.

4. The system will take some time to generate the package based on the data volume.

5. To handle this delay, use the until function and add a delay. Use the provided URL to check the status of the export job.

6. Assign the retrieved status to the Compose action.

   body('Get_the_execution_status')?['value']

7. The until loop will continue running until the status equals "Success."

8. After that, add a condition to check the status, and based on the result, proceed with downloading the file.

9. To download the file, trigger the API URL using the POST method and pass the executionId in the request body.

{Resource}/data/DataManagementDefinitionGroups/Microsoft.Dynamics.DataEntities.GetExportedPackageUrl


{"executionId":"<Execution Id>"}

10. Finally, upload the downloaded file to Blob Storage.


OutPut:


File uploaded to Blob:


  • We have passed the required parameters, and it is returning the execution ID.

  • We are passing the execution ID, and it is returning the status.

  • We are passing the execution ID, and it is returning the temporary blob URL.

  • We are assigning it to the blob, and it is being saved in the blob.


Keep Daxing!!

Sunday, March 16, 2025

Creating a ZIP File and push to D365 Using REST API in Logic Apps

Creating a ZIP File and push to D365 Using REST API in Logic Apps

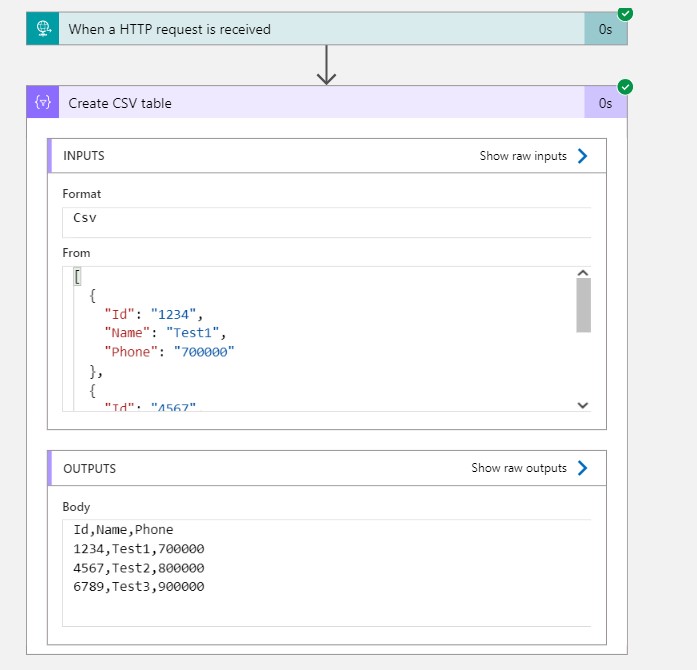
           I will receive a CSV file, which I need to convert into a ZIP file. This ZIP file will then be pushed to D365.


        To create the ZIP file, I have developed an Azure Function. The input file for the function will be the CSV file, and within the code, I will fetch the manifest files from the blob storage.


Creating a ZIP File Using Azure Function

1. I have a CSV file that needs to be converted into a ZIP file, which will include two manifest XML files.

2. The CSV file is picked from the input.

3. The manifest XML files are stored in blob storage. Within the code, I connect to the blob storage and retrieve the XML files.

4. These three files (the CSV and two XML files) are added to the ZIP file, which is then returned by the function.

Click Here to create Azure Function:

Code:

using System;
using System.IO;
using System.Threading.Tasks;
using Microsoft.AspNetCore.Mvc;
using Microsoft.Azure.WebJobs;
using Microsoft.Azure.WebJobs.Extensions.Http;
using Microsoft.AspNetCore.Http;
using Microsoft.Extensions.Logging;
using Newtonsoft.Json;
using Microsoft.WindowsAzure.Storage.Blob;
using System.IO.Compression;
using Microsoft.WindowsAzure.Storage.Auth;
using Microsoft.WindowsAzure.Storage;

namespace Test.test.CreateZip
{
    public static class CreateZipFile
    {
        [FunctionName("CreateZipFile")]
        public static async Task<IActionResult> Run(
            [HttpTrigger(AuthorizationLevel.Function, "get", "post", Route = null)] HttpRequest req,
            ILogger log)
        {
            try
            {
                log.LogInformation("CreateZipFile function triggered");

                if (req.Body != null)
                {
                    string fileName     = req.Query["FileName"];
                    string processName  = req.Query["ProcessName"];

                    CloudBlobClient         cloudBlobClient;
                    CloudBlobContainer      cloudBlobContainer;
                    CloudStorageAccount     cloudStorageAccount;
                    string                  blobFolder = "";

                    // Connecting to azure blob
                    cloudStorageAccount = CloudStorageAccount.Parse(Environment.GetEnvironmentVariable("BlobConnectionString"));
                    cloudBlobClient     = cloudStorageAccount.CreateCloudBlobClient();
                    cloudBlobContainer  = cloudBlobClient.GetContainerReference(Environment.GetEnvironmentVariable("BlobContainerName"));

                    switch (processName)
                    {
                        case "Process1":  blobFolder = Environment.GetEnvironmentVariable("Prcoess1Folder"); break;
                        case "Prcoess2":  blobFolder = Environment.GetEnvironmentVariable("Prcoess2Folder"); break;
                        case "Prcoess3":  blobFolder = Environment.GetEnvironmentVariable("Prcoess3Folder"); break;
                    }                   
                  
                    CloudBlobDirectory cloudBlobDirectory = cloudBlobContainer.GetDirectoryReference(blobFolder);

                    if (cloudBlobDirectory == null)
                    {
                        log.LogError("An error occurred : Blob is not connected. Check the Environment Variables");

                        return new BadRequestObjectResult("Blob is not connected. Check the Environment Variables");
                    }

                    CloudBlockBlob Manifestblob         = cloudBlobDirectory.GetBlockBlobReference("Manifest.xml");
                    CloudBlockBlob PackageHeaderblob    = cloudBlobDirectory.GetBlockBlobReference("PackageHeader.xml");

                    using (var zipStream = new MemoryStream())
                    {
			// Adding files to zip stream
                        using (var archive = new ZipArchive(zipStream, ZipArchiveMode.Create, true))
                        {
                            await AddToZipFile(archive, fileName, null, req.Body);
                            await AddToZipFile(archive, "Manifest.xml", Manifestblob);
                            await AddToZipFile(archive, "PackageHeader.xml", PackageHeaderblob);
                        }

                        zipStream.Position = 0;
						
			//Adding zip stream to response
                        req.HttpContext.Response.ContentType = "application/zip";
                        req.HttpContext.Response.Headers["Content-Disposition"] = $"attachment; filename={processName + ".zip"}";

                        await zipStream.CopyToAsync(req.HttpContext.Response.Body);
                    }

                    return new OkObjectResult(req.HttpContext.Response.Body);
                }
                else
                {
                    log.LogError("An error occurred : File is mandatory");

                    return new BadRequestObjectResult("File is mandatory");
                }
            }
            catch (Exception ex)
            {
                log.LogError(ex, "An error occurred");

                return new BadRequestObjectResult(ex.ToString());
            }
        }
		
        public static async Task<MemoryStream> downloadAsync(CloudBlockBlob blob)
        {
	    //Downoad the file from blob
            using (var stream = new MemoryStream())
            {
                await blob.DownloadToStreamAsync(stream);

                return stream;
            }
        }
		
        public static async Task AddToZipFile(ZipArchive archive, string fileName, CloudBlockBlob blob, Stream inputStream = null)
        {
            var zipFile = archive.CreateEntry(fileName, CompressionLevel.Optimal);

	    // Add the file to zip stream
            using (var entryStream = zipFile.Open())
            {
                if (blob != null)
                {
                    var result =  await downloadAsync(blob);

                    using (var fileToCompressStream = new MemoryStream(result.ToArray()))
                    {
                        fileToCompressStream.CopyTo(entryStream);
                    }
                }
                else
                { 
                    await inputStream.CopyToAsync(entryStream);
                }
            }
        }
    }
}


Process Workflow

1. Fetch the CSV file from blob storage and pass it to the Azure Function.

2. After the ZIP file is created, delete the original CSV file.

3. Generate an D365 authentication token.

4. Call the GetAzureWriteUrl API to retrieve a temporary blob URL.

URL: ('D365URL')/data/DataManagementDefinitionGroups/Microsoft.Dynamics.DataEntities.GetAzureWriteUrl

Headers: 

{
  "Authorization": "Bearer @{body('Generate_D365_Token')?['access_token']}"
}
Body:
{
  "uniqueFileName": "@{outputs('File_Name')?[triggerBody()?['ProcessName']]?['ImportProject']}_DMFPackage"
}

             Get the temporary blob url from previous step.

        json(body('Get_Azure_Write_URL')?['value'])

5. Upload the ZIP file to the temporary blob using the URL.   

    Headers: 

{
  "x-ms-blob-type": "BlockBlob"
}

6. Call the ImportFromPackage API to push the ZIP file to D365.

URL: 

('D365URL')}/data/DataManagementDefinitionGroups/Microsoft.Dynamics.DataEntities.ImportFromPackage

Headers: 

{
  "Authorization": "Bearer @{body('Generate_D365_Token')?['access_token']}"
}

body: 

{
  "packageUrl": "@{outputs('Fetch_blob_url')?['BlobUrl']}",
  "definitionGroupId": @{outputs('File_Name')?[triggerBody()?['ProcessName']]?['ImportProject']},
  "executionId": "",
  "execute": true,
  "overwrite": true,
  "legalEntityId": @{triggerBody()?['Company']}
}

7. Add a 1-minute delay after calling the until function.

    for until I have used the below expression.

or(equals(variables('D365 Message status'), 'Succeeded'), 
    equals(variables('D365 Message status'), 'PartiallySucceeded'),
    equals(variables('D365 Message status'), 'Failed'),
    equals(variables('D365 Message status'), 'Canceled'))

8. Use the ExecutionSummary URL to check the import status.

URL: 

('D365URL')}/data/DataManagementDefinitionGroups/Microsoft.Dynamics.DataEntities.GetExecutionSummaryStatus

body: 

{
    "executionId": "@{body('Push_file_to_D365')?['value']}"
}

9. Assign the status retrieved from the execution summary to the D365 message status variable.

10. If the status is not "Succeeded," send an email notification.


Response: 

      • CSV file is fetched from Blob.


      •  Function app return the zip file.

      • Token is generated.

      • File is pushed to D365.

      • 1st time the execution status is Executing


      • 2nd time the execution status is Success.


Keep Daxing!!